Table of Contents(1)
Overview
What is the DHT Sensor?
The DHT Sensor is a widely utilized temperature and humidity sensor. It incorporates a dedicated Negative Temperature Coefficient (NTC) component for temperature measurement, as well as an 8-bit microcontroller that transmits temperature and humidity values as serial data. The sensor is factory calibrated, simplifying its interface with other microcontrollers.
With a temperature measurement range of 0°C to 50°C and a humidity range of 20% to 90%, the sensor provides accurate readings with an accuracy of ±1°C for temperature and ±1% for humidity. If you require measurements within this specified range, the DHT Sensor is an excellent choice for your application.
Introduction to DHT11/DHT22
The DHT11 humidity and temperature sensor is available in two forms: as a sensor and as a module. The module version includes a pull-up resistor and a power-on LED, distinguishing it from the basic sensor version. The DHT11 is specifically a relative humidity sensor that measures the surrounding air conditions. It utilizes a combination of a thermistor and a capacitive humidity sensor. The humidity sensing element consists of two electrodes with a moisture-holding substrate acting as a dielectric between them. Changes in humidity levels result in variations in capacitance. The sensor's integrated circuit measures and processes these changes in resistance values, converting them into a digital format.
In contrast, the DHT22 also employs a capacitive humidity sensor and a thermistor to measure the surrounding air. It provides a digital output signal on the data pin, eliminating the need for analog input pins. While it is relatively simple to use, obtaining data from the DHT22 requires precise timing. One limitation of this sensor is that new data can only be retrieved every 2 seconds. Consequently, when using a library, the sensor readings may be up to 2 seconds old. To connect the DHT22, you need to supply power (3-5V) to the leftmost pin, connect the second pin to your data input pin, and ground the rightmost pin. It's important to note that although it uses a single wire for data transmission, it is not compatible with the Dallas One Wire protocol. If multiple sensors are used, each must have its own dedicated data pin.
The Difference Between DHT11/DHT22
| DHT11 | DHT22 | |
| Temperature | 0 to 50℃ | -40 to 80℃ |
| Humidity | 20 to 95% RH | 0 to 100%RH |
| Temperature accuracy | ±2℃ | ±0.5℃ |
| Humidity Accuracy | ±5% | ±2% |
When considering humidity accuracy, humidity range, temperature accuracy, and temperature range, the DHT22 surpasses the DHT11. The only drawback of the DHT22 is its higher price compared to the DHT11. However, this higher cost is justified by the better performance it offers.
If you require a sensor with a wider accuracy and range, the DHT22 is the ideal choice. Nevertheless, the DHT11 is still a viable option that can perform well in various projects. Both DHT sensors are commonly recognized as basic and slow humidity and temperature sensors, making them suitable for hobbyists and beginners engaged in data logging. They both utilize a single digital pin and have slow response times. It's important to note that querying either sensor more than once per second is not feasible.
Lab Objectives
Understand the basics of using an Arduino Uno R3 board. This objective focuses on familiarizing yourself with the Arduino Uno R3 board, its components, and its functionality. You will learn about its pin configurations, power requirements, and how to program it.
Learn how to interface a DHT sensor with the Arduino board. This objective involves connecting the DHT sensor to the Arduino Uno R3 board correctly. You will understand the wiring connections, including the necessary resistors and capacitors, and how to ensure proper communication between the sensor and the board.
Acquire temperature and humidity data from the DHT sensor. This objective aims to retrieve accurate temperature and humidity readings from the DHT sensor. You will learn how to use the appropriate libraries and code to communicate with the sensor and obtain reliable data.
Explore ways to visualize the collected data. This objective encourages you to analyze and present the logged data effectively. You can experiment with various techniques, such as creating graphs or charts, to visually represent the temperature and humidity trends over a specific period.
Components and Supplies
Pinout
| # | Pin | Function |
|---|---|---|
| 1 | + |
3V - 5V |
| 2 | OUT |
Data |
| 3 | - |
Ground |

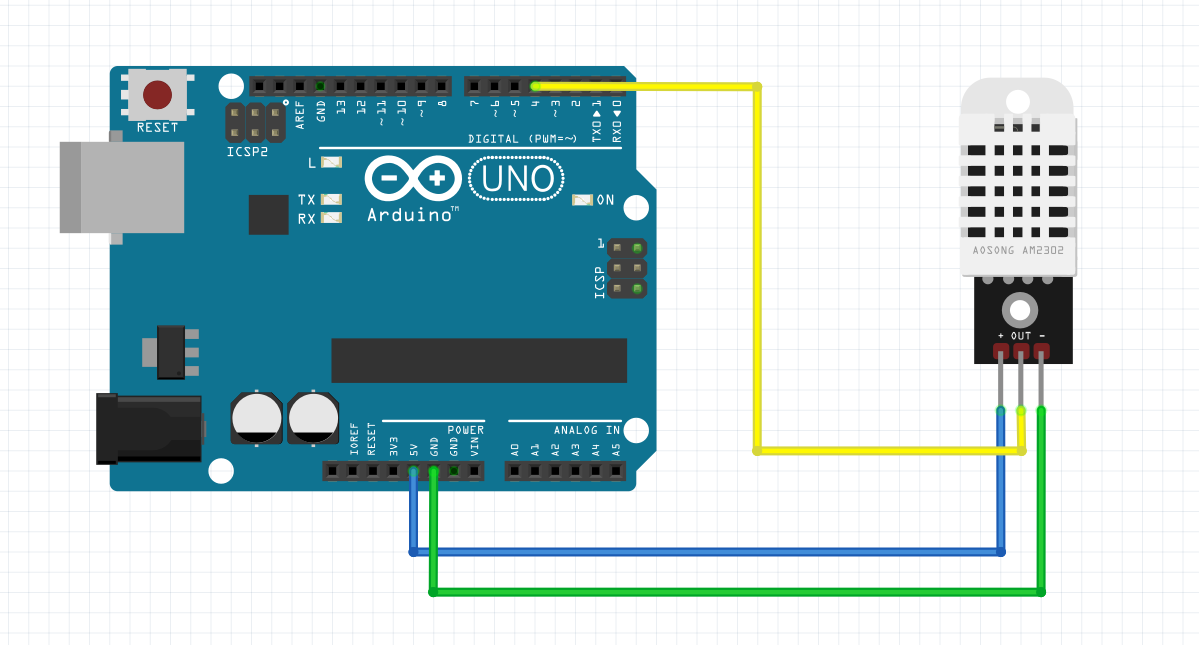
Wiring
| # | DHT22 Pin | UNO R3 Pin |
| 1 | + | 5V |
| 2 | OUT | D4 |
| 3 | - | GND |
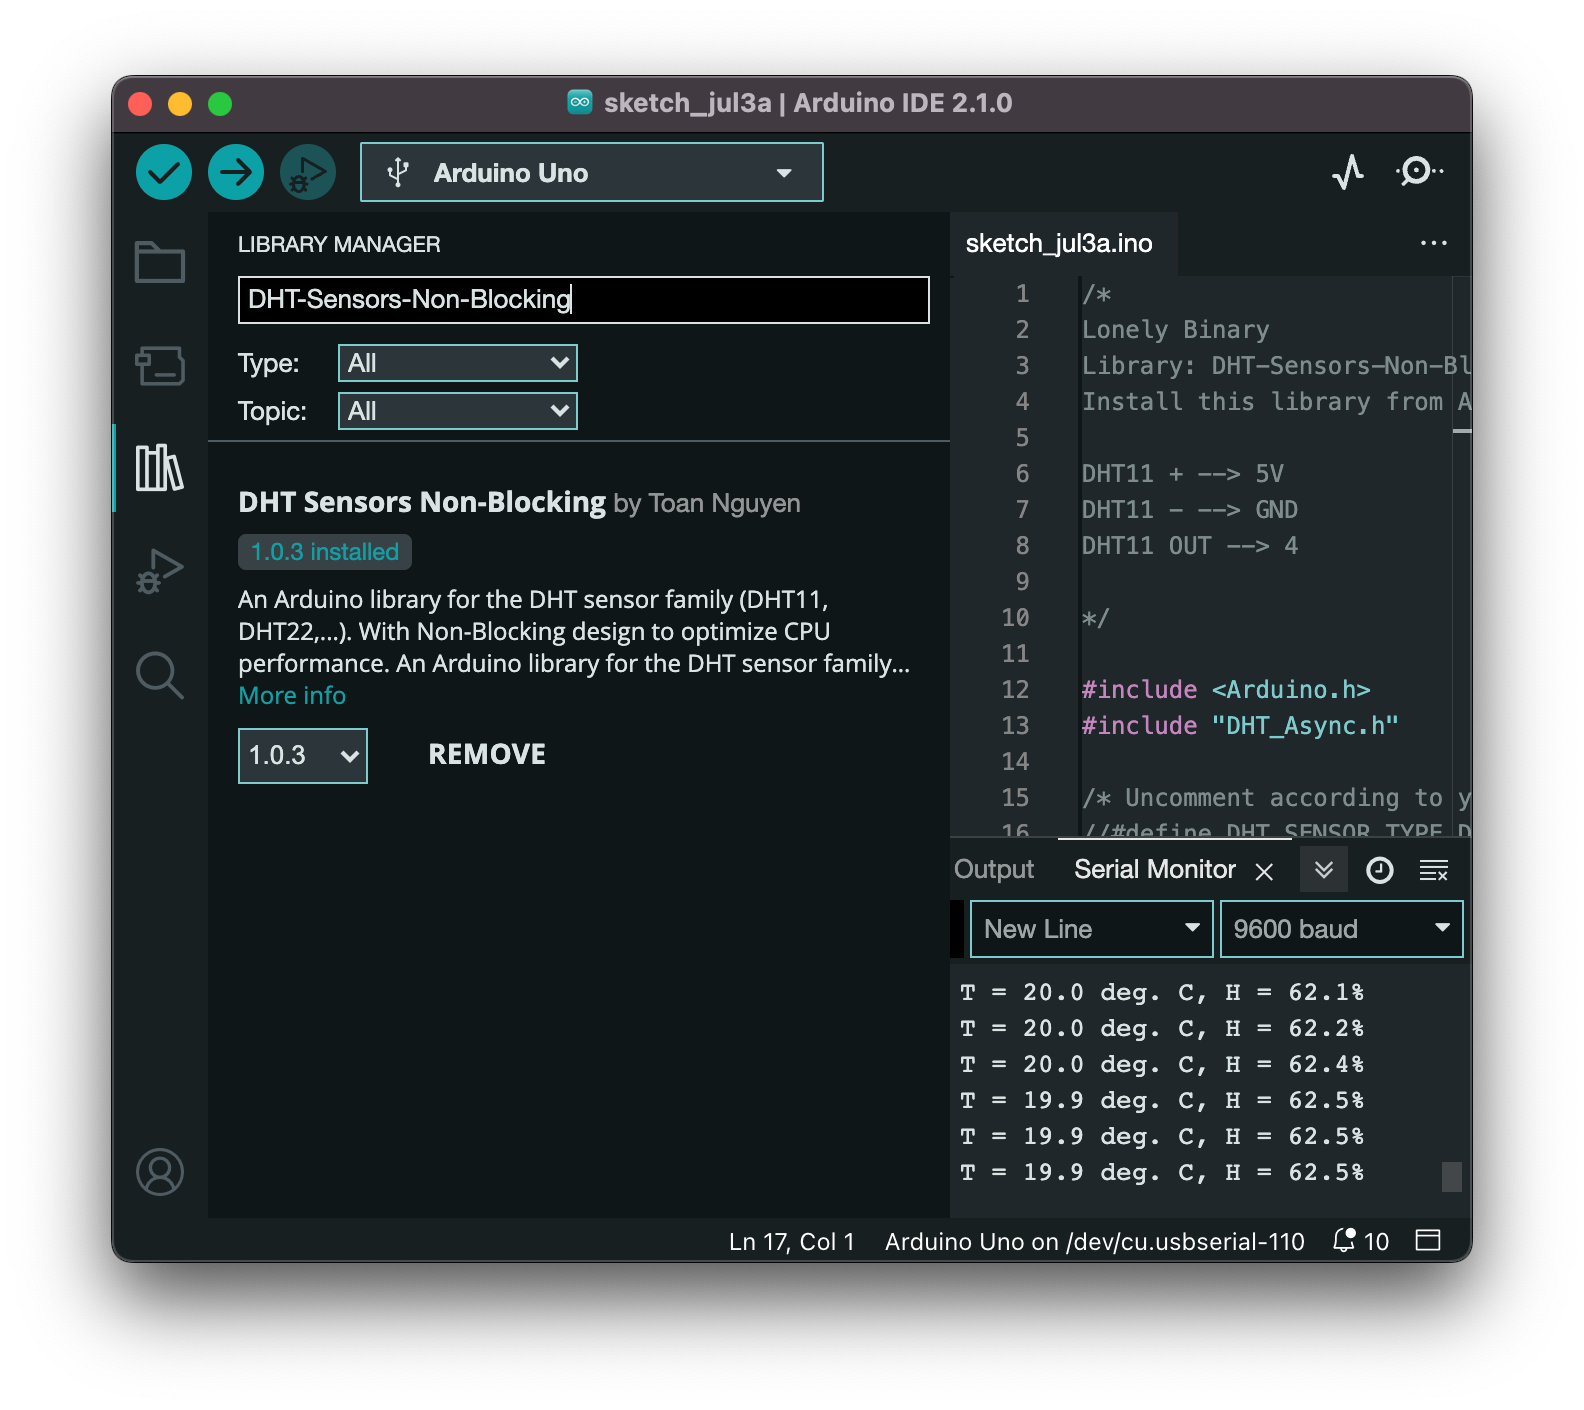
Library

toannv17/DHT-Sensors-Non-Blocking
For convenient interfacing with DHT11 and DHT22 modules, we suggest using the DHT-Sensors-Non-Blocking library. This Arduino library is specifically designed for the DHT sensor family, including the DHT11 and DHT22. It utilizes a non-blocking design to optimize CPU performance, ensuring efficient and smooth operation of the sensor modules.
Installing a library is a straightforward process that can be done swiftly. To begin, launch the Arduino IDE. Once the editor is open, direct your attention to the left column. Here, you'll notice a few icons. Locate and click on the "library" icon. Instantly, a comprehensive list of all the libraries at your disposal will materialize. You also have the option to search for a specific library. Once you've identified the desired library, simply click on the "INSTALL" button, and the installation process will commence.