Table of Contents(9)
Overview
What is the HC-05 Bluetooth Module?
The HC-05 module enables wireless communication between electronic devices over short distances. It uses Bluetooth technology to establish a serial communication link between a microcontroller or other embedded systems and a host device like a smartphone, tablet, or computer.
What is the HC-05 used for?
Key Features:
1. Bluetooth Version: HC-05 is typically based on Bluetooth version 2.0 + EDR (Enhanced Data Rate).
2. Serial Communication: It communicates with the host microcontroller using serial UART (Universal Asynchronous Receiver-Transmitter) communication protocol.
3. Operating Voltage: Most HC-05 modules operate at 3.3V or 5V, making them compatible with a wide range of microcontrollers and development boards.
4. Operating Range: The effective range of communication varies depending on the conditions but is typically around 10 meters (class 2).
5. Configuration Modes: The HC-05 module can operate in different modes, including AT command mode for configuration and transparent communication mode for data transfer.
6. PIN Interface: It has a set of pins for power supply, ground, serial communication (TX and RX), and mode selection (e.g., AT mode).
7. Pairing: It supports both master and slave modes, allowing it to connect to other Bluetooth devices as either the primary (master) or secondary (slave) device.
How does HC-05 control LED?
To control an LED using an Arduino Uno R3 and an HC-05 Bluetooth module, you'll need to follow these general steps:
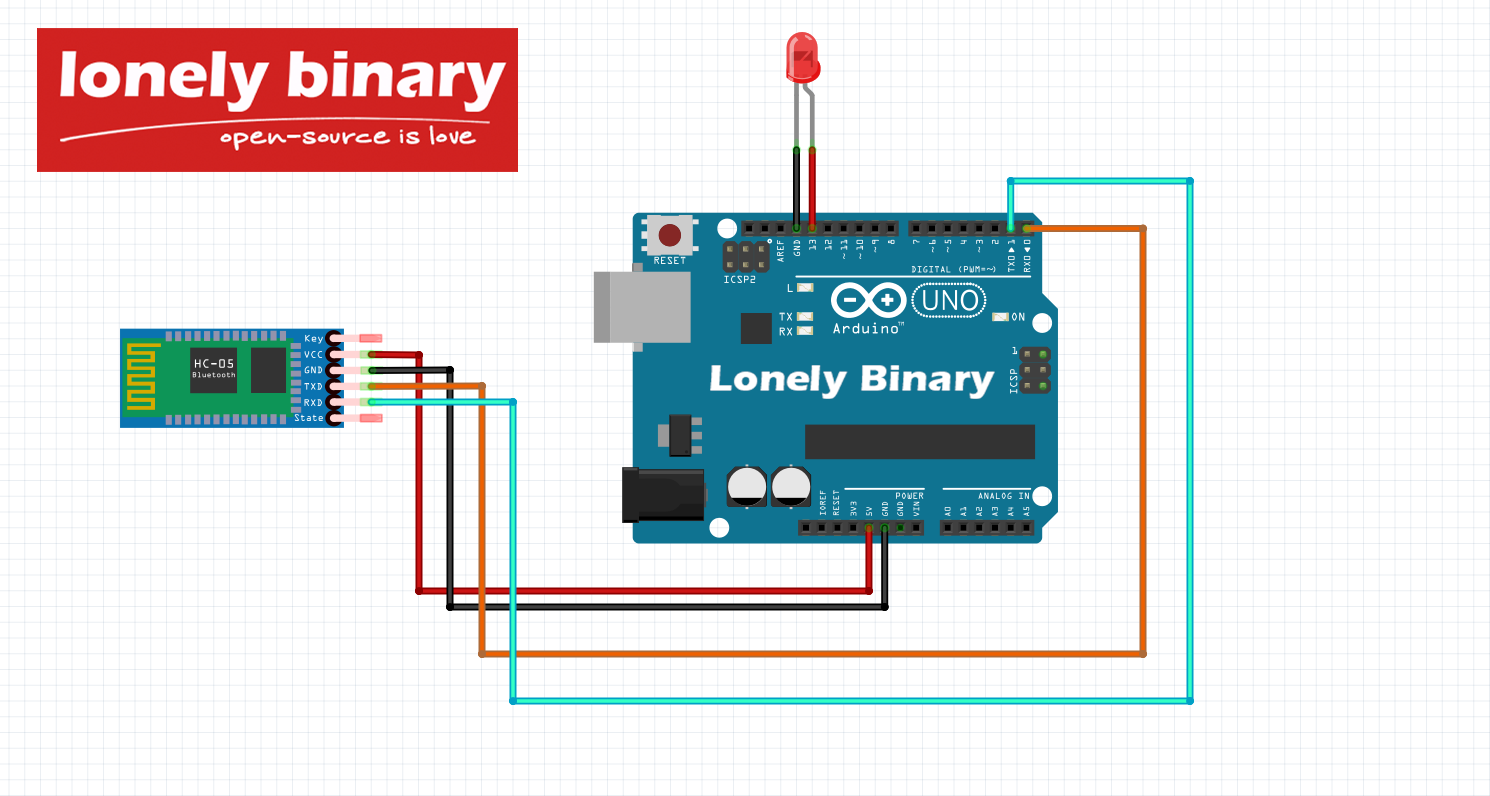
1. Hardware Setup: Connect the HC-05 module to the Arduino Uno R3. Typically, you'll connect the HC-05 module's TX pin to Arduino's RX pin, and the HC-05's RX pin to Arduino's TX pin. Also, ensure that the HC-05 module is powered properly (3.3V or 5V depending on the module).Connect an LED and a current-limiting resistor to one of the digital output pins of the Arduino Uno R3. For example, connect the anode of the LED to a digital pin (e.g., pin 13) and connect the cathode through a resistor (220-330 ohms) to ground.
2. Software Setup:Write a sketch (Arduino program) that listens for commands over the serial port and controls the LED accordingly. Pair your HC-05 module with your Bluetooth-enabled device (e.g., smartphone or computer).
3. Bluetooth Communication:Use a serial terminal app on your Bluetooth-enabled device to send commands (e.g., '1' to turn on the LED, '0' to turn it off) to the HC-05 module connected to the Arduino Uno R3.
4. Testing:Upload the sketch to your Arduino Uno R3. Power up the Arduino Uno R3 and ensure that the HC-05 module is paired with your Bluetooth device. Open the serial terminal app on your Bluetooth device and send commands to control the LED.
Components and Supplies
Pinout
| # | Pin | Function |
|---|---|---|
| 1 | State |
It can be used as a feedback to check if Bluetooth is working properly. |
| 2 | RXD |
Receive Serial Data. Every serial data given to this pin will be broadcasted via Bluetooth. |
| 3 | TXD |
Transmits Serial Data. Everything received via Bluetooth will be given out by this pin as serial data. |
| 4 | Ground |
Ground pin of module connect to system ground. |
| 5 | Vcc |
Powers the module. Connect to +5V Supply voltage |
| 6 | EN |
This pin is used to toggle between Data Mode (set low) and AT command mode (set high). By default it is in Data mode |

Wiring
| # | HC-05 Pin | UNO R3 Pin |
| 1 | VCC | 5V |
| 2 | GND | GND |
| 3 | TXD | RX |
| 4 | RXD | TX |