Overview
Playing Music With A Speaker in UNO R3 Project
This beginner-friendly project involves programming an Arduino to create a simple speaker project. It serves as an excellent introduction to Arduino programming and allows you to grasp the fundamentals.
By undertaking this project, you can gain familiarity with the basic concepts of Arduino programming while working with a speaker. It offers an accessible way to get started and build your skills in the Arduino ecosystem.
How Does the Arduino Speaker Work?
The Arduino generates a signal that is outputted through Digital pin 3. This signal drives the speaker, resulting in the production of sound. By modifying the program, it is possible to play different songs or create custom melodies by adjusting the frequency and rhythm of the tones. This project provides a foundation for exploring the creative possibilities of sound generation using Arduino.
In the program, the 'tone()' function is used to generate tones. This function creates a square wave with a specific frequency and a 50% duty cycle on a designated pin. It can also be accompanied by a duration parameter to define the length of time the tone should play. If no duration is specified, the wave will continue until a 'noTone()' function call is made.
By connecting the Arduino pin to a piezo buzzer or any other compatible speaker, the generated tones can be played through the speaker. This allows for the creation of various sounds and melodies using the 'tone()' function in conjunction with different frequencies and durations.
The provided code utilizes an additional file called "pitches.h". This file includes pitch values for various musical notes. Each note is represented by a constant, such as NOTE_C4 for middle C or NOTE_FS4 for F sharp.
By referencing these note constants in the 'tone()' function instead of specifying the frequency directly, we can easily produce specific musical notes. This note table can be a valuable resource whenever you wish to create musical melodies for your Arduino speaker.
Lets get Start
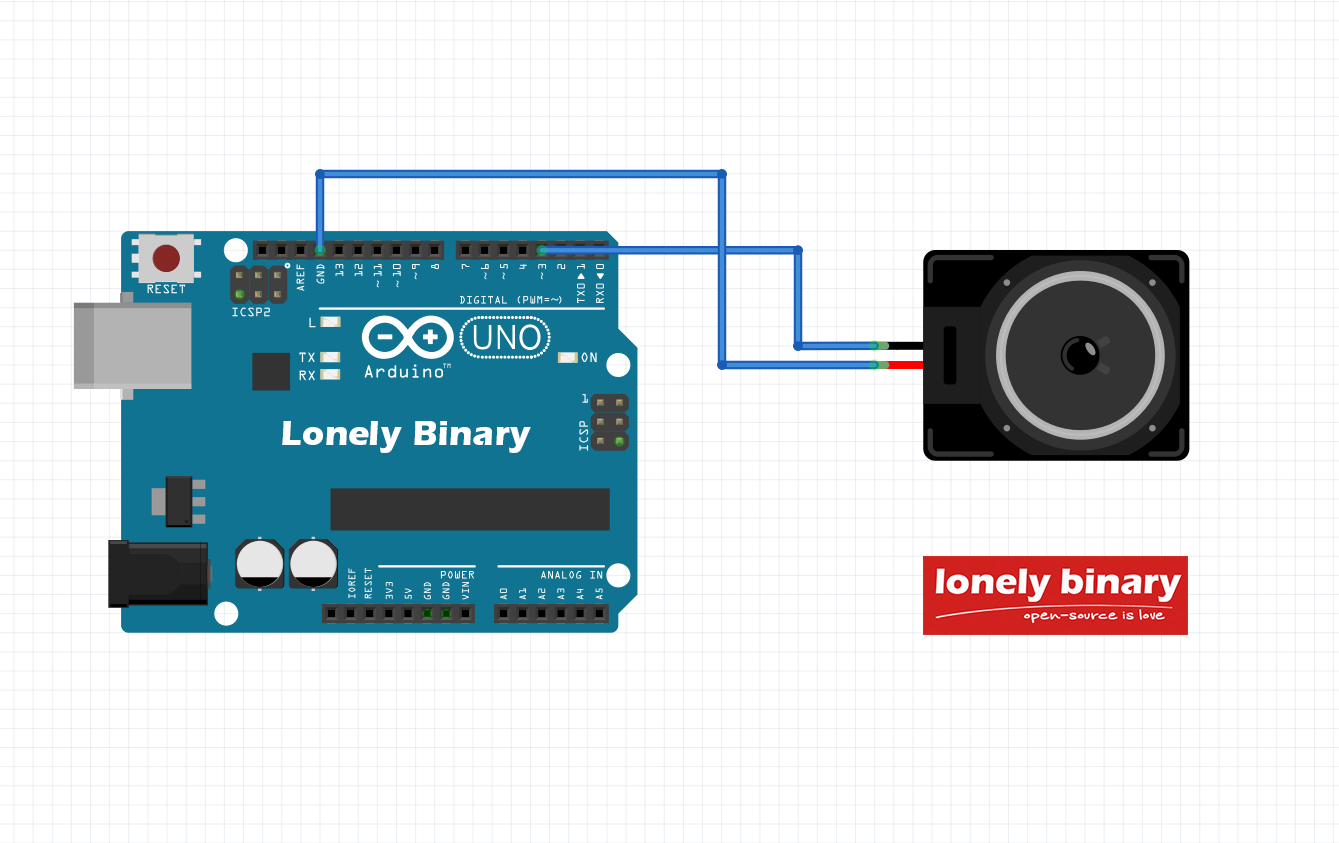
1. Identify the digital pin you want to use for generating the tones. In this case, let's use Digital Pin 3 as an example.
2. Connect one wire of the speaker or piezo buzzer to Digital Pin 3 on the Arduino.
3. Connect the other wire of the speaker or piezo buzzer to the ground (GND) pin on the Arduino.
By establishing this connection, the Arduino will be able to send the generated tones to the speaker or piezo buzzer through the Digital Pin 3. The ground connection ensures a complete circuit for the audio signal.
Lab Objectives
The objective of the "Playing Music with a Speaker in UNO R3" project is to utilize an Arduino UNO R3 board to generate musical tones and play them through a speaker. By achieving this objective, you will gain an understanding of the following concepts and skills:
1. Generating tones: Learn how to use the Arduino board to generate specific frequencies and durations for musical tones.
2. Interfacing with a speaker: Establish the necessary connections between the Arduino board and a speaker to produce sound.
3. Controlling musical notes: Utilize the pitch values or note constants from the "pitches.h" file to create melodies and play different musical notes.
4. Timing and rhythm: Understand how to program the Arduino board to control the timing and rhythm of the musical tones, creating melodies with proper timing.
5. Creative expression: Explore the creative possibilities of combining different notes, rhythms, and durations to compose and play your own music using the Arduino and the speaker.
By completing this project, you will enhance your programming skills, gain experience in hardware interfacing, and have the satisfaction of playing music with your Arduino UNO R3 board and speaker setup.
Components and Supplies
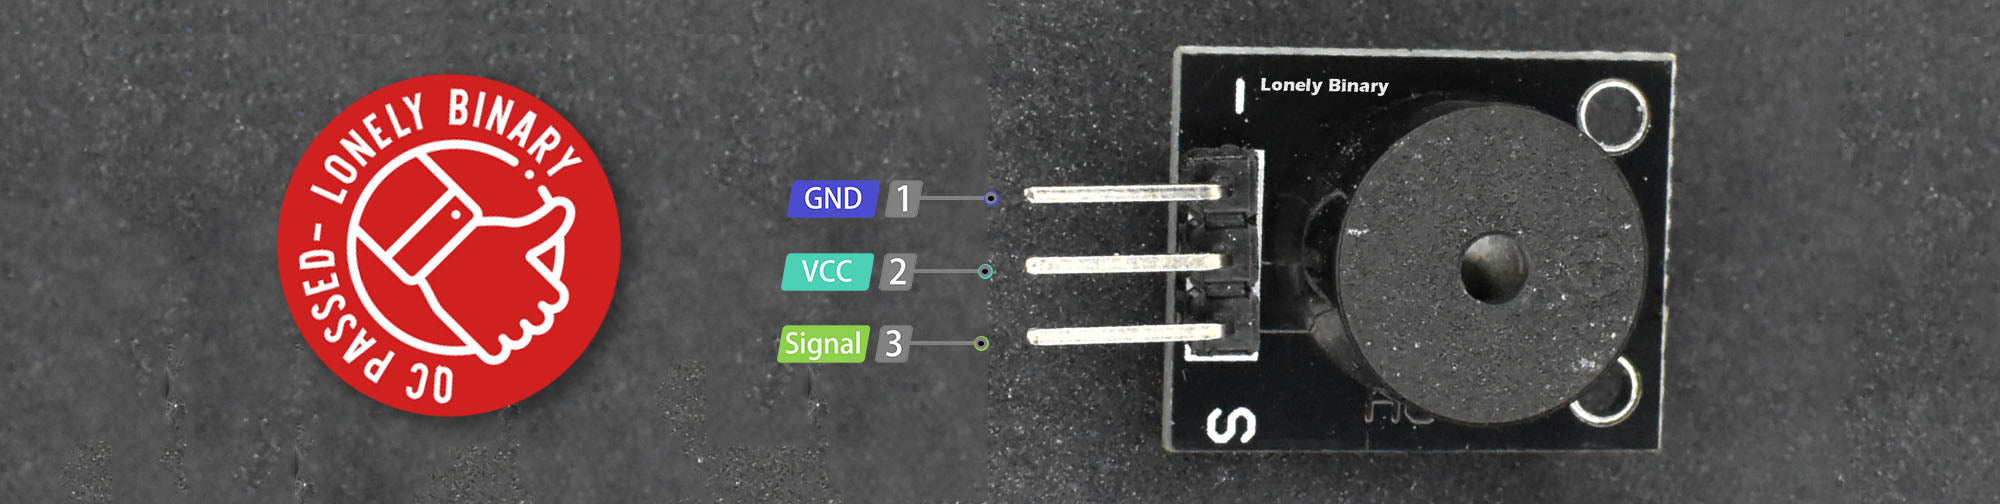
Pinout
| # | Pin | Function |
|---|---|---|
| 1 | - |
Ground (GND) |
| 2 | VCC |
Power supply (VCC) 2.0 - 5.5V |
| 3 | S |
Input signal (Signal) |
Wiring
| # | DS3231Pin | UNO R3 Pin |
| 1 | - | GND |
| 2 | S | D3 |
Library

robsoncouto/arduino-songs
There are many Arduino Speaker Songs examples available on GitHub. If you're interested, you can download the files from the repository. These codes are compatible with all Arduino boards and should run without any issues. The sketches rely exclusively on the built-in 'tone()' function provided by Arduino, resulting in monophonic sounds. The advantage is that you won't need any additional libraries for these projects, keeping the setup simple and straightforward.

