Overview
Arduino LDR Tutorial For Beginner
If you're new to Arduino and want to explore the world of electronics, working with a Light-Dependent Resistor (LDR) is a great place to start. An LDR is a simple yet versatile component that changes its resistance based on the amount of light falling on it. By combining an LDR with an Arduino board, you can create projects that respond to changes in light intensity, opening up a wide range of possibilities for creative exploration.
In this tutorial, we will explore how this fascinating property of the LDR can be harnessed to create an intriguing project. By leveraging the LDR's light-sensing capabilities, we can embark on an exciting journey to build something truly captivating.
How does Light Dependent Resistor (or Light Photoresistor Sensor) working
The LDR sensor module serves the purpose of detecting light intensity. It is equipped with both analog and digital output pins, labeled AO and DO respectively on the board. As light is present, the resistance of the LDR decreases proportionally to the intensity of the light. In other words, the stronger the light, the lower the resistance of the LDR. To further enhance the sensor's performance, it features a potentiometer knob that allows adjustment of the LDR's sensitivity to light.
The resistance values of an LDR or photoresistor can exhibit a significant range, with values reaching several megohms in darkness and dropping to a few hundred ohms under bright light conditions.
Due to their wide resistance variation, LDRs are user-friendly and offer numerous circuit options for utilization. Moreover, the sensitivity of light-dependent resistors or photoresistors varies based on the wavelength of the incident light.
LDRs are constructed using semiconductor materials that provide them with light-sensitive properties. While various materials can be employed, cadmium sulphide (CdS) has been a popular choice, although its usage is now restricted in Europe due to environmental concerns associated with cadmium. Similarly, other cadmium-based semiconductor materials like cadmium CdSe are also subject to restrictions. Alternative materials such as lead sulphide (PbS) and indium antimonide (InSb) can also be used.
When photons of light interact with the semiconductor material, they transfer energy to the electrons within, providing them with enough energy to break free from the crystal lattice. As a result, these freed electrons become capable of conducting electricity, leading to a reduction in the resistance of the semiconductor and consequently the overall resistance of the LDR.
This process occurs gradually, meaning that as more light illuminates the LDR semiconductor, a greater number of electrons are released to facilitate the conduction of electricity. Consequently, the resistance continues to decrease as more electrons participate in the conduction process.
Lets get Start
Step 1: Gather the necessary components:
Arduino UNO R3 board (Or Arduino Mega Board) , Light Dependent Resistor (LDR) and some Jumper wires
Step 2: Set up the Arduino IDE:
Download and install the Arduino IDE software from the official Arduino website.
Connect your Arduino board to your computer using a USB cable.
Open the Arduino IDE and select the appropriate board and port from the Tools menu.
Step 3: Write the code
In the Arduino IDE, create a new sketch.
Write the code to read the analog value from the LDR using the analogRead() function.
Store the obtained value in a variable.
Step 4: Upload the code to the Arduino:
Click the "Upload" button in the Arduino IDE to compile and upload the code to your Arduino board. And wait for the upload process to complete.
Step 5: Monitor the results:
Open the Serial Monitor in the Arduino IDE (accessible through the Tools menu).
Set the baud rate to match the one specified in the code. The Serial Monitor will display the analog values read from the LDR in real-time as the light conditions change.
Step 6: Experiment and observe:
Vary the intensity of light falling on the LDR and observe the corresponding changes in the analog values displayed in the Serial Monitor. Try covering the LDR or shining a flashlight on it to see how it responds to different light conditions.
Lab Objectives
1. Understand the basic principles of light-dependent resistors and their behavior in response to varying light intensities.
2. Gain proficiency in connecting an LDR to an Arduino board and utilizing the analog input functionality.
3. Learn how to read and interpret the analog values obtained from the LDR using Arduino programming.
4. Explore the real-time monitoring of light intensity changes through the Serial Monitor in the Arduino IDE.
5. Enhance troubleshooting skills by identifying and resolving common issues encountered when working with LDRs and Arduino.
6. Encourage creative exploration and experimentation with LDRs, fostering a deeper understanding of their applications in sensor-based projects.
By accomplishing these objectives, participants will develop a solid foundation in using LDRs with Arduino boards and be equipped with the skills necessary to pursue further projects and experiments involving light sensing and control.
Components and Supplies
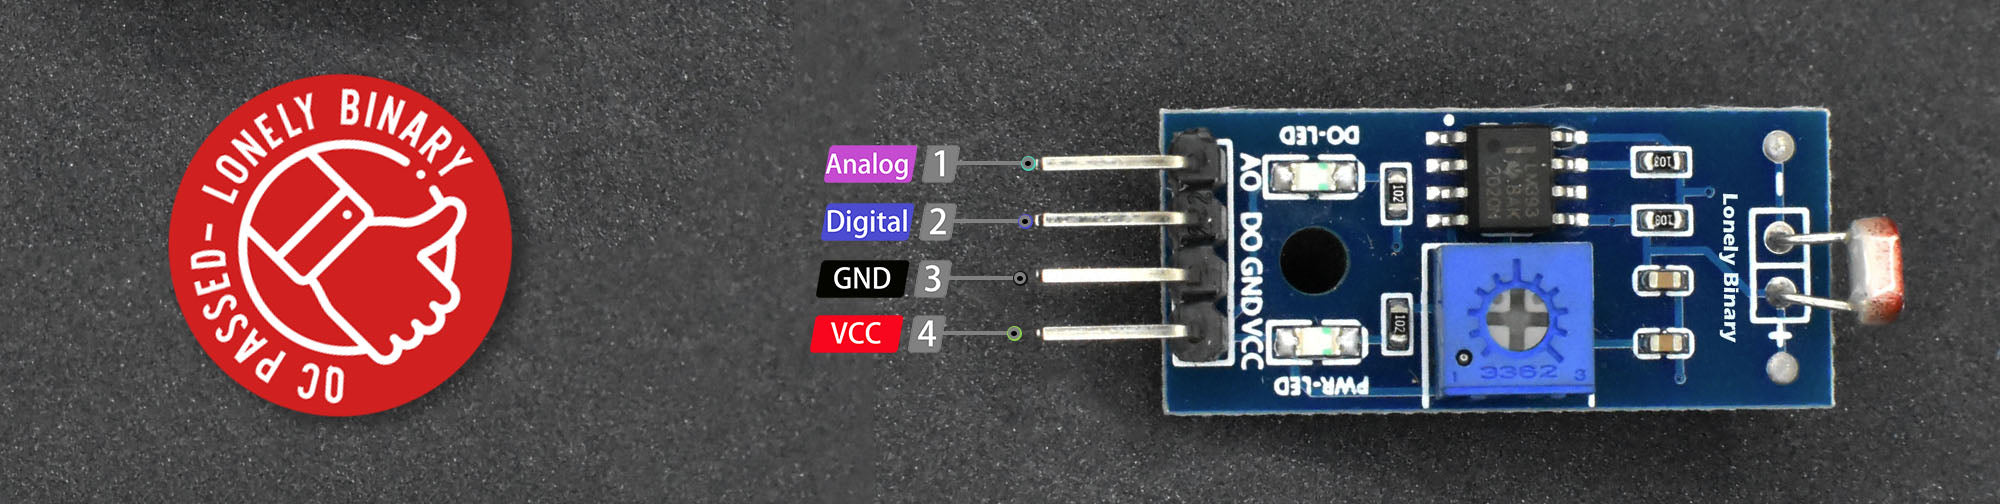
Pinout
| # | Pin | Function |
|---|---|---|
| 1 | AO |
Analog Output |
| 2 | DO |
Digital Output |
| 3 | GND |
Ground |
| 4 | VCC |
Input Voltage 3.3V to 5V |
Wiring
| # | Light Sensor | UNO R3 |
| 1 | GND | GND |
| 2 | AO | A0 |
| 3 | VCC | 5V |

