Overview
Vibration Sensor SW-420 Tutorial
Accurately sensing vibrations is a challenging task, yet it opens up a multitude of applications. This tutorial focuses on the SW-420 vibration sensor and its interface with Arduino, providing valuable insights for effortless vibration measurement design. By following this tutorial, you can gain a better understanding of how to work with the SW-420 sensor and effectively incorporate it into your projects for vibration measurement purposes.
The SW-420 vibration sensor is accompanied by a breakout board that incorporates the LM393 comparator, an adjustable onboard potentiometer for sensitivity threshold selection, and a signal indication LED. This module is capable of generating logic states based on the presence or absence of vibrations or external forces acting upon it. When no vibration is detected, the module produces a logic LOW output. However, when vibrations are sensed, the output switches to logic HIGH. The circuit operates within a working bias range of 3.3V to 5V DC, allowing for flexibility in power supply options.
The Vibration module utilizes the SW-420 vibration sensor and the LM393 comparator to detect vibrations exceeding a set threshold. The threshold level can be adjusted using the onboard potentiometer. When there is no vibration detected, the module outputs a logic LOW signal, causing the indicator LED to remain off. Conversely, when vibrations surpass the threshold, the module outputs a logic HIGH signal, resulting in the LED indicator turning on. This module provides a straightforward and visual indication of vibration presence based on the adjustable threshold level.
SW-420 Working Principle
The SW-420 vibration sensor module is an affordable and versatile module that includes the SW-420 vibration sensor and the LM393 voltage comparator. It offers a convenient interface for detecting vibrations and is commonly used in both DIY and commercial projects.
The module consists of the SW-420 vibration sensor itself, an LM393 voltage comparator, a potentiometer for adjusting sensitivity, current limiting resistors for voltage division and current control, and capacitors for biasing and noise filtering.
The SW-420 vibration sensor functions as a switch, responding to the magnitude of vibrations in its surroundings. It can open or close the electrical contact based on the detected vibration. This switch can be implemented using electromechanical, relay, or semiconductor components.
By default, the vibration sensor is in a closed state, maintaining conduction when no vibrations are detected. Once vibrations are sensed, the contacts open, causing an increase in resistance. This change triggers a pulse, which is then passed to the LM393 voltage comparator IC. The comparator digitizes the signal and provides it as a digital output on the module's output pin.
Lets get Start
Step 1: Gather the components
Collect the required components for this project, including the Arduino UNO board, the SW-420 Vibration Sensor module, an LED, a current-limiting resistor, jumper wires, and a breadboard.
Step 2: Connect the components
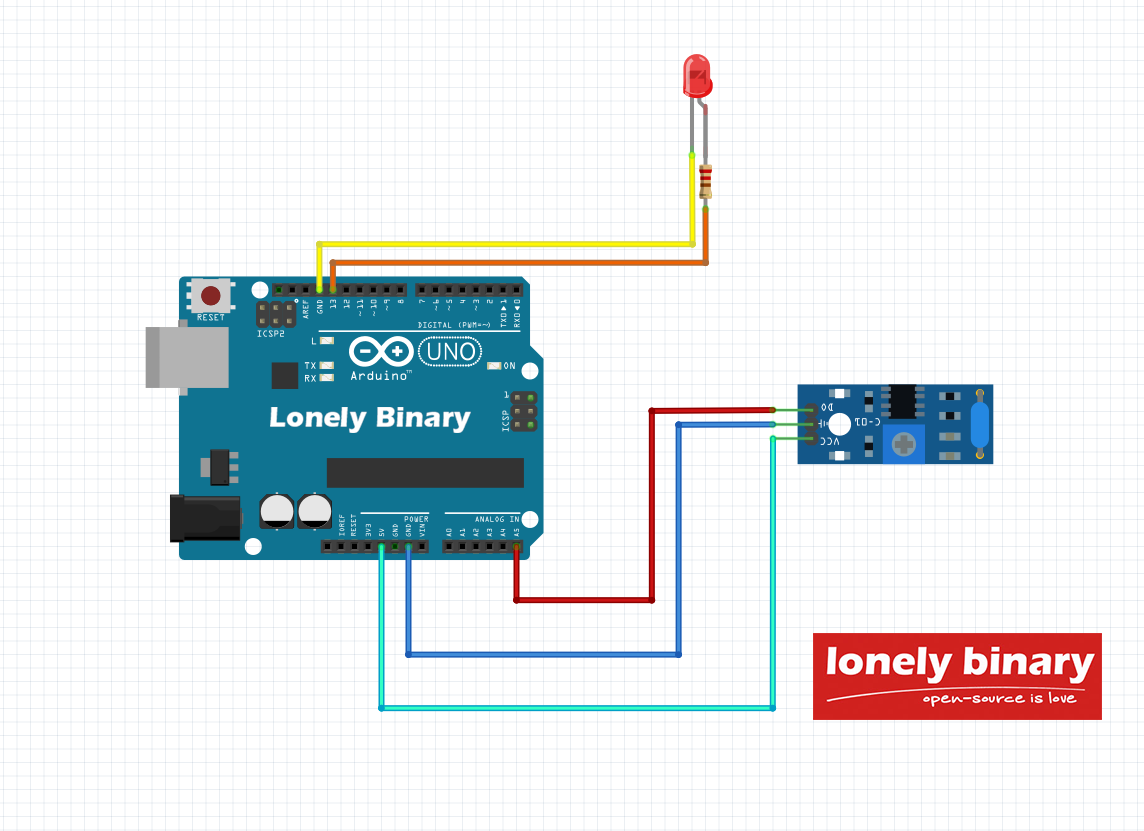
Connect the SW-420 Vibration Sensor module to the Arduino UNO board. Ensure that the VCC pin of the module is connected to the 5V pin of the Arduino, the GND pin to the GND pin, and the DO pin to A5 pin.
Connect the LED to the Arduino by connecting its longer leg (anode) to a current-limiting resistor and then to Digital Pin 13. Connect the shorter leg (cathode) of the LED to GND.
Step 3: Write the code
Write the Arduino code that reads the digital input from the SW-420 Vibration Sensor module and controls the LED accordingly. The code should detect changes in the sensor's output and toggle the LED on and off.
Step 4: Upload the code and test
Upload the code to the Arduino UNO using the Arduino IDE. Once uploaded, observe the LED's behavior as it blinks in response to detected vibrations.
By following this tutorial, you will successfully interface the Arduino UNO with the SW-420 Vibration Sensor module, creating a circuit that alerts you with LED blinking whenever vibrations are detected. This project serves as an excellent starting point for incorporating vibration sensing into your Arduino-based projects.
Lab Objectives
Learn about the SW-420 Vibration Sensor: Understand the working principle and capabilities of the SW-420 Vibration Sensor module, including its ability to detect vibrations and trigger an output signal.
Understand the Arduino Interface: Gain familiarity with the Arduino UNO board and its capabilities for connecting and interacting with external sensors and components.
Interface the SW-420 Vibration Sensor with Arduino: Learn how to physically connect the SW-420 Vibration Sensor module to the Arduino UNO board, establishing the necessary electrical connections.
Code Implementation: Gain hands-on experience in writing Arduino code to read the digital output from the SW-420 Vibration Sensor and control the LED based on the detected vibrations.
Sensor Calibration and Threshold Adjustment: Learn how to calibrate the SW-420 Vibration Sensor and adjust the threshold for vibration detection, ensuring optimal performance and sensitivity.
LED Blinking Alert: Understand how to control the LED using Arduino programming, creating a visual indicator that blinks when vibrations are detected by the SW-420 Vibration Sensor.
Test and Verification: Perform tests to validate the functionality of the circuit and confirm that the LED accurately reflects the presence of vibrations.
Documentation and Presentation: Practice documenting your project, including the circuit diagram, code, and step-by-step instructions. Prepare a presentation to showcase your work and explain the concepts and techniques used in the project.
By completing this lab, you will gain a solid understanding of interfacing the SW-420 Vibration Sensor module with an Arduino, and you will have practical experience in using the sensor to trigger LED blinking based on detected vibrations. These skills will provide a foundation for future projects involving vibration sensing and Arduino-based applications.
Components and Supplies
Pinout
| # | Pin | Function |
|---|---|---|
| 1 | VCC |
Power supply 5V |
| 2 | GND |
GROUND |
| 3 | DO |
Input signal (Digital) |

Wiring
| # | SW420 Pin | UNO R3 Pin |
| 1 | DO | A5 |
| 2 | GND | GND |
| 3 | VCC | 5V |